Kids Cup Cakes Decor

In need of activities to do at home with the kids? Our team at Winik’s Kid’s Club is here to share our signature cupcake recipe so you can easily make them at home.

These kid-friendly cupcake recipe will not only be fun for you and your little ones to eat, but allow creativity and imagination during the decorating process. With garnishes of cookies, candy, and frosting, just make sure you’re prepared for the inevitable sugar rush.

Here the vanilla cupcakes with butter cream frosting to make some Cookie Monsters, which are perfect to do at home.

Ingredients

for the cupcakes:

  • 2 eggs
  • ¾ cup sugar
  • ½ cup vegetable oil
  • 1 ½ teaspoons pure vanilla extract
  • 1 ¼ cups cake flour
  • 1 ¼ teaspoons baking powder
  • ½ teaspoon baking soda
  • ½ teaspoon salt
  • ½ cup buttermilk

for the buttercream frosting:

  • ½ cup shortening
  • ½ cup unsalted butter, softened
  • 1 teaspoon pure vanilla extract
  • 4 cups confectioners’ sugar
  • 2 tablespoons milk
  • icing color(s), preferably in gel/paste format, of choice (optional)

Décor

  • Chocolate Chips
  • Cookies of your preference

Instructions

for the cupcakes:

  1. Preheat oven to 350°F. Lightly grease or place 16 cupcake liners in muffin tin(s). I used one 12-cup muffin tin and one 6-cup muffin tin (using only 4 of the 6 cups) .
  2. In a large bowl, using an electric mixer, beat eggs and sugar.
  3. Add oil and vanilla to bowl and beat to combine.
  4. In a medium bowl, wisk together cake flour, baking powder, baking soda and salt
  5. Add half of the flour mixture to the egg mixture and beat on low speed to combine. Add half of the buttermilk and beat on low speed to combine, scraping down sides as necessary.
  6. Repeat step 5 with remaining half of flour and half of buttermilk.
  7. Divide batter evenly among 16 prepared cups of muffin tins. Each cup should be about 2/3 full.
  8. Bake in preheated oven for 12-14 minutes or until a toothpick inserted into the middle of a cupcake comes out clean.
  9. Place muffin tin(s) on racks and cool for 10 minutes.
  10. Remove cupcakes from tins and cool on racks until ready to frost.

for the frosting:

  1. In a large bowl, using an electric mixer, beat shortening and butter until well combined.
  2. Add vanilla to bowl and beat to combine.
  3. Add confectioners’ sugar one cup at a time, beating well after each addition.
  4. Add milk and beat until frosting is light and fluffy.
  5. Add small amount of icing color to bowl (using a toothpick), beat well until color is incorporated. Add additional coloring if needed to reach desired color. (optional)
  6. Frost cupcakes using a pastry bag fitted with tip of choice.
  • To make the eyes, pipe out two balls of white butter icing (use a baggie with the corner snipped off if you don’t have a pastry bag)
  • Add a chocolate chip, with the flat surface facing upwards, to each ball of white butter frosting
  • Use a knife to make a cut for the mouth and wedge in your favorite cookie

Enjoy and try not to eat them all at once!

NIZUC at Home – Workout With Celebrity Performance Trainer Artur Zolkiewicz

Many of our guests will have met renowned performance coach, Artur Zolkiewicz, during his last residency at NIZUC Resort & Spa in September 2019.  Artur will be returning to Mexico later this year, but until we can all be together again in this little corner of paradise, he has filmed an introductory warm-up and exercise circuits for NIZUC guests to try at home.  With exercises like the bird dog, crab, beast crawl and side clam, you would be mistaken for thinking you were already on the beach! 

Find a quiet space & work out alongside Artur Zolkiewicz as he takes you through a sequence of stretching & strengthening exercises. Each sequence has been designed to be a stand-alone practice or can be built up into a longer tailor-made series.

A LIVE Instagram Session with Artur Zolkiewicz is confirmed for May 11th, 2020 at 12:00pm CTS / 6:00pm BST / 1:00pm EST at NIZUC Instagram account.

We will be sharing more routines over the coming weeks so stay tuned!

Winik’s Mini-Olympics

While the 2020 Olympics may be postponed, now is the time to start planning your own Winik’s mini-Olympics at home with the kids!

Our team from Winik’s Kid’s Club at NIZUC recommends the following activities to cultivate an atmosphere of teamwork, physical activity and fun at home, while also helping to improve cognitive and emotional development.

  • Make flags, ribbons, Olympic rings, medals and other decorations with materials you have at home or can easily and safely find at a store near you. Decorations are important; they add to the atmosphere and excitement to the event.
  • Choose a Mascot – let your kids decide what sort of mascot they would like: a teddy bear, a scarecrow, a budgie or a special character created by them.
  • Have fun and get creative with making paper planes and boats – the more types, sizes and colors the better!
  • Create a score board with stickers and your own illustrations or decorations of choice! On this board you will write the names of all players and keep track of their wins for the final Olympics awards ceremony.

Here are some Olympics game ideas for kids ages 4-12 with simple materials you have at home: (Kids below the age of 4 can assist with the crafts and the awards ceremony)

Egg race: This game consists of each player simply running or walking fast, carrying a hardboiled egg on a spoon to a specified location. Only one hand is allowed to hold the spoon. Whoever finishes the race first with the egg still on the spoon is the winner.

Discus Throwing: Make discus out of paper plates by gluing two paper plates together and decorating them as you wish. Mark an area in your home or outside that is a few meters away from four seated participants. Throw a die to establish who starts the game. Each participant throws one or two discus (depending on skills). Each discus that lands inside the specified area a few meters away counts as one point.

Bean Bag Toss/Balloon toss: Set up five buckets in the colors of the Olympic rings (Red, blue, green, yellow and black). If you don’t have buckets in each color, you can add labels to each bucket. Give five small bean bags or balloons filled with some sugar, flour or sand (all in different colors) to each participant. Place the buckets in the middle of the two teams in a circle, a yard or two away from the participants. Each participant takes a turn at tossing each bean bag into the bucket of the same color.  The participant that scores the most bags in the buckets wins the game.

Paper Planes Game: Make colorful paper planes together – have fun decorating! Remind participants to write their names on their planes. Once the planes are ready, hold a competition to see which can fly the farthest. It’s often the simplest of games that are the most fun!

Sailing Race: Make colorful paper planes together – have fun decorating! All participants must assign names for their boats. Once the boats are ready, each participant should use a straw to blow his or her boat the farthest distance along a table or on water (in a tub or pool). The boat that goes farthest and reaches the end of the tub or pool first is the winner.

Stacking Competitions (with dominoes, Lego blocks, plastic cups etc.): Once you have your materials, each participant should build a pyramid using those items. Establish a time limit (1 to 3 minutes) for each participant to build his or her pyramid. The participant with the tallest tower within the time limit is the winner!

Balloon Race: Blow up a balloon to a size slightly smaller than a soccer ball. Place it between the knees and try to walk or run to a specified location. The participant who reaches the specified location first is the winner! Try it again with 2-3 laps to make things a bit more challenging and exciting.

Rhythmic FUNastics Competition: Each participant should perform using the best of his or her abilities with dance moves, gymnastics, ballet, etc. using with Hula Hoops, balls, rope, ribbons or any other fun materials of their preference. The judge(s) will give each participant a score of 1-10 based on their performance. We recommend putting on some fun, energetic music for this game!

End your Winik´s Olympics with a Closing Ceremony parade so the kids can show off their medals! You can even make wreaths for the athletes to put on during the Ceremony, just like the ancient Olympic athletes wore.

A Reason to Celebrate Cinco de Mayo with NIZUC!

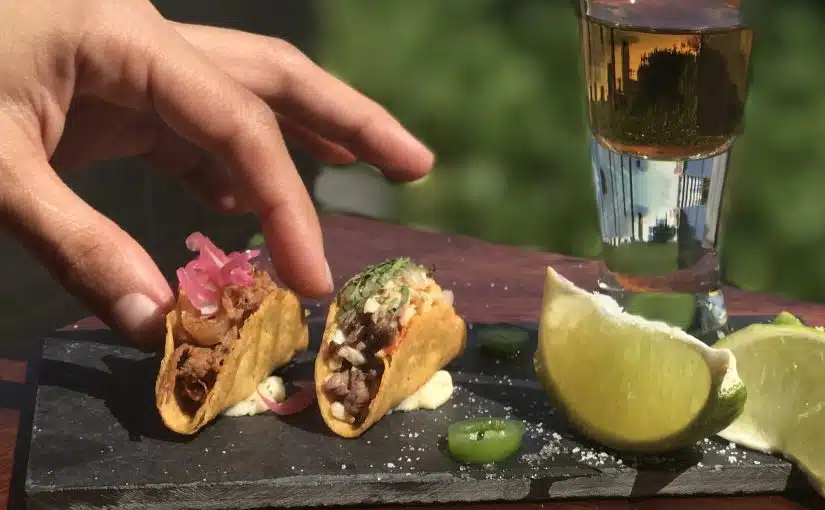
Celebrating Cinco de Mayo at home with some flavorful tacos from La Punta Grill and refreshing Margaritas from Bar A´Kan.

Grilled Rib Eye Tacos

Ingredients

  • 1 Rib eye 
  • 1 Red Tomato
  • 1 Onion
  • 1 chili- Jalapeño, serrano or habanero
  •  Olive oil
  •  1 garlic clove
  •  1 avocado
  • Tortillas
  •  Salt and pepper to taste

*To make handmade Tortillas

Ingredients

  • 2 cups of corn flour
  • 1 ½ to 2 cups of warm water
  • A Tortilla press machine

Instructions:

1. In a large bowl place 2 cups of corn flour, add 1 ½ to 2 cups of very warm water. Mix well and let sit for 5 to 10 minutes.

2. Begin working the mixed ingredients with your hands to make the dough. Work the dough for several minutes. Press the dough with your fingers and the palms of your hands as if you were kneading bread dough. The dough will be a little gritty at first, but should become more pliable as you knead it. If at any point through the tortilla making process the dough seems too dry or too wet, add a little more water or corn flour to the dough.

3. Pinch off a piece of the dough and rub it between your hands to shape it into a small ball the size of a plum, or slightly large golf ball.

4. Cut two pieces of plastic from a plastic freezer bag into the shape of the surface of the tortilla press. Open the tortilla press and lay one piece of plastic on the press. Place the ball in the center. Place another piece of plastic over the ball. Gently close the press and press down, until the dough has spread to a diameter of 4 to 5 inches.

5. Prepare a well-seasoned cast iron griddle or large cast iron pan works well to cook the tortillas. Working one at a time, hold a tortilla in your hand, carefully removing the plastic on each side. Allow the tortilla to rest half on your hand, and half hanging down, and gently lay the tortilla down on to the pan. Start working on pressing the next tortilla.

6. Cook the tortilla on the hot pan for 30 seconds to a minute on each side. The tortilla should be lightly toasted and little air pockets forming.

7. When your tortillas are ready wrap them in a dish towel to keep them warm and set aside.

Instructions:

*For Salsa Tatemada

1. Preheat grill to high

2. Place on the grill the tomato, onion and chili with a little bit of olive oil. Grill for 10 minutes or until vegetables are blistered and charred in spots on all sides, turning occasionally.

3. Remove from grill and place tomato, chili, onion, garlic into a “Molcajete” (a traditional Mexican version of a mortar and pestle made from volcanic rock) or on a blender just for few seconds, season with salt and pepper to taste.

*For Rib Eye

1. Season with salt and pepper and olive oil.

2. Heat grill to medium-high. Grill steaks over direct heat for 4–5 minutes per side to medium rare.

3. Remove to platter and let rest for few minutes.

4. When ready to serve, slice across the grain into strips.

Assembly:

Set on a plate 3-4 tortillas and fill with a few slices of rib eye, add a spoonful of salsa tatemada and set on top some avocado slices.

Accompany your tacos with some NIZUC Margaritas!!